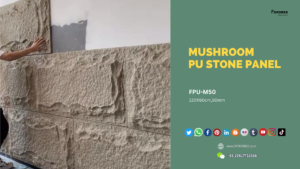
PU Stone wall panel install guide
Installing PU (polyurethane) stone panels is a straightforward process that can be completed with basic tools and adhesive. Here’s a step-by-step guide to installing PU stone panels:
- Prepare the Surface:
- Ensure that the surface where the PU stone panels will be installed is clean, dry, and free from dust, grease, or other contaminants.
- If necessary, apply a suitable primer or bonding agent to the surface to improve adhesion.
- Plan the Layout:
- Determine the layout and positioning of the PU stone panels on the surface, taking into account any design considerations or architectural features.
- Use a level and straightedge to ensure that the panels will be installed evenly and aligned correctly.
- Cut Panels to Size:
- Measure and mark the PU stone panels according to the desired dimensions and layout.
- Use a saw, utility knife, or other appropriate cutting tool to trim the panels to size, taking care to make clean, accurate cuts.
- Apply Adhesive:
- Apply a suitable construction adhesive or panel adhesive to the back of each PU stone panel, following the manufacturer’s instructions.
- Ensure that the adhesive is spread evenly across the entire back surface of the panel, with extra attention to the edges and corners.
- Install Panels:
- Carefully position the first PU stone panel onto the prepared surface, pressing it firmly into place.
- Use a level to ensure that the panel is plumb and level, making any adjustments as needed.
- Continue installing additional panels, working from one corner or edge outward in a systematic manner.
- Leave a small gap between panels for expansion and contraction, typically around 1/8 to 1/4 inch.
- Secure Panels:
- Once all panels are installed, use brads, nails, or screws to secure them to the surface, if necessary. Be sure to countersink any fasteners to ensure a flush finish.
- Fill Joints and Gaps:
- Fill any gaps between panels and around the perimeter with a suitable sealant or caulking compound, ensuring a watertight seal and a seamless appearance.
- Finish and Clean Up:
- Allow the adhesive and sealant to cure according to the manufacturer’s instructions.
- Once cured, remove any excess adhesive or sealant and clean the surface of the PU stone panels to remove any dirt or debris.
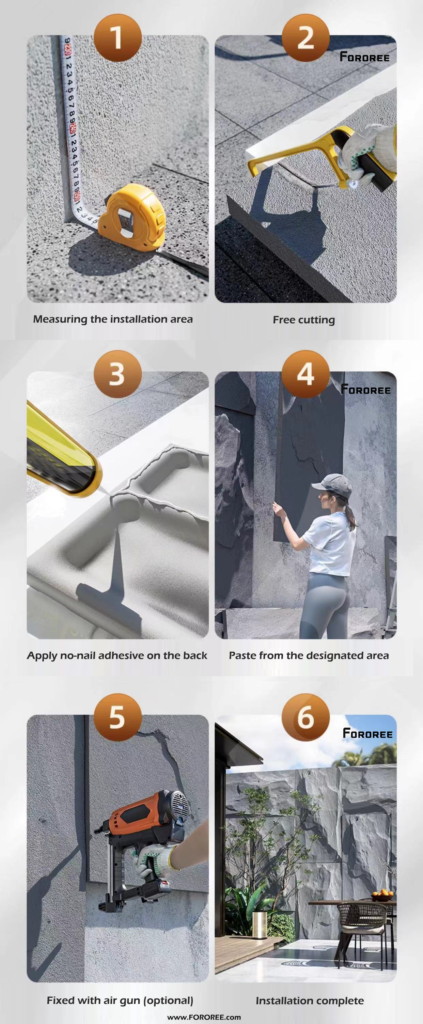
By following these steps carefully and attentively, you can install PU stone panels effectively, achieving a professional-looking finish that enhances the appearance of any interior or exterior space.
During install the PU Stone should pay attention to what facts?
When installing PU (polyurethane) stone panels, it’s crucial to pay attention to several factors to ensure a successful and durable installation. Here are some key considerations:
- Surface Preparation: Ensure that the wall surface is clean, dry, and free from dust, grease, or other contaminants. Repair any cracks or defects in the substrate before installing the panels.
- Adhesive Selection: Use a high-quality construction adhesive recommended by the manufacturer for bonding PU stone panels to the wall surface. Follow the adhesive manufacturer’s instructions for application and curing times.
- Panel Alignment: Pay attention to the alignment and positioning of the panels to ensure a uniform and visually pleasing installation. Use a level and straightedge to ensure that the panels are installed straight and level.
- Spacing and Joints: Leave a small gap between panels for expansion and contraction, typically around 1/8 to 1/4 inch. Fill any gaps between panels and around the perimeter with a suitable sealant or caulking compound to ensure a watertight seal.
- Fastening: Secure the panels to the wall surface using appropriate fasteners if required, such as brads, nails, or screws. Be sure to countersink any fasteners to ensure a flush finish.
- Trimming and Cutting: Use a sharp utility knife or saw to trim PU stone panels to size as needed. Make clean, accurate cuts to achieve a neat and professional finish.
- Sealing and Finishing: Apply a protective sealant or coating to the surface of the PU stone panels after installation to enhance durability and resistance to moisture, UV radiation, and staining. Follow the manufacturer’s recommendations for application and curing.
- Safety: Wear appropriate personal protective equipment, such as gloves and eye protection, when handling PU stone panels and working with adhesives and sealants. Follow safety guidelines and precautions to prevent accidents or injuries during the installation process.
By paying attention to these factors and following best practices for installation, you can ensure a successful and long-lasting installation of PU stone panels that enhances the appearance and durability of any interior or exterior space.
Which walls are suitable to install PU Faux Stone Panels ?

PU (polyurethane) stone panels are versatile and can be installed on various types of walls, both interior and exterior. Suitable walls for installing PU stone panels include:
- Drywall: PU stone panels can be installed directly onto drywall using adhesive. Ensure that the drywall is structurally sound and free from moisture or damage before installation.
- Plywood: Plywood walls provide a stable surface for installing PU stone panels. Secure the panels to the plywood using adhesive and fasteners as needed.
- Concrete: Concrete walls offer a durable and stable substrate for PU stone panel installation. Clean the surface thoroughly and use adhesive to secure the panels in place.
- Brick or Masonry: PU stone panels can be installed over existing brick or masonry walls to achieve a decorative stone veneer look. Apply adhesive directly to the brick or masonry surface before installing the panels.
- Cement Board: Cement board, such as fiber cement or cementitious backer board, provides a suitable substrate for PU stone panel installation. Secure the panels to the cement board using adhesive and fasteners as required.
- Metal Studs: PU stone panels can be installed over metal stud walls using appropriate adhesive and fasteners. Ensure that the metal studs are properly spaced and securely anchored to the structure.
- Exterior Insulation and Finish Systems (EIFS): EIFS walls can be covered with PU stone panels to add texture and visual interest to the façade. Use adhesive to attach the panels directly to the EIFS substrate.
- Wood Framing: PU stone panels can be installed on walls framed with wood studs or framing members. Secure the panels to the framing using adhesive and fasteners as necessary.
In general, PU stone panels can be installed on most flat, structurally sound, and clean wall surfaces. It’s essential to follow the manufacturer’s installation guidelines and ensure proper surface preparation for a successful installation. Additionally, consider factors such as moisture resistance, compatibility with adhesives, and local building codes when selecting walls for PU stone panel installation.
Where PU stone veneer panel could be installed?
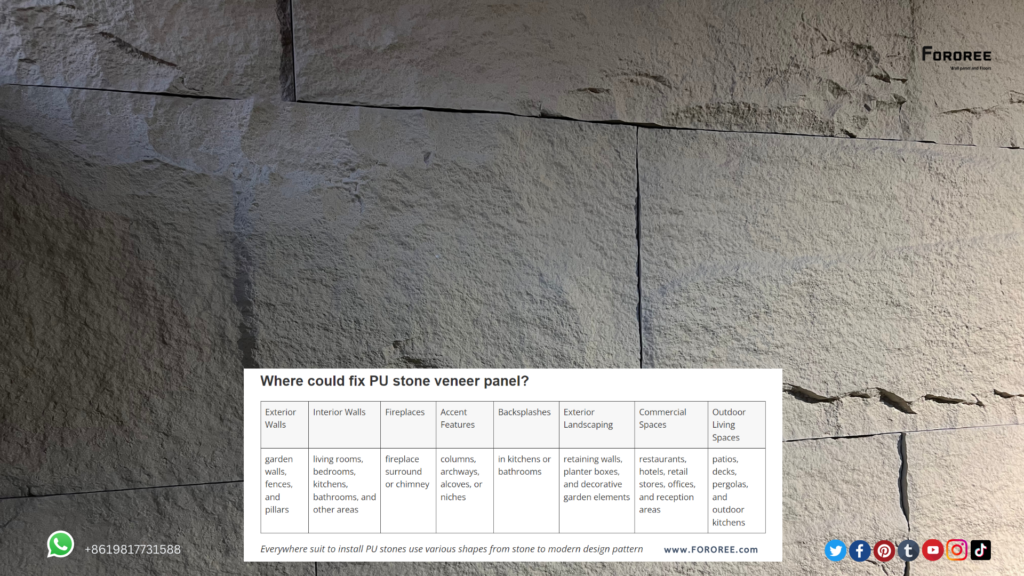
| Exterior Walls | Interior Walls | Fireplaces | Accent Features | Backsplashes | Exterior Landscaping | Commercial Spaces | Outdoor Living Spaces |
| garden walls, fences, and pillars | living rooms, bedrooms, kitchens, bathrooms, and other areas | fireplace surround or chimney | columns, archways, alcoves, or niches | in kitchens or bathrooms | retaining walls, planter boxes, and decorative garden elements | restaurants, hotels, retail stores, offices, and reception areas | patios, decks, pergolas, and outdoor kitchens |
You can fix PU (polyurethane) stone panels in various indoor and outdoor locations to enhance the aesthetics and functionality of the space. Here are some common places where PU stone panels can be installed:
Exterior Walls: PU stone panels are commonly used for exterior wall cladding on residential homes, commercial buildings, and outdoor structures such as garden walls, fences, and pillars.
Interior Walls: Install PU stone panels on interior walls to create focal points, accent walls, or to add texture and visual interest to living rooms, bedrooms, kitchens, bathrooms, and other areas.
Fireplaces: Enhance the appearance of a fireplace surround or chimney with PU stone panels to create a rustic, traditional, or modern look, depending on the style of the space.
Accent Features: Use PU stone panels to create accent features such as columns, archways, alcoves, or niches to add architectural interest and character to the space.
Backsplashes: Install PU stone panels as a backsplash in kitchens or bathrooms to protect the wall surface from water splashes and stains while adding a decorative element to the space.
Exterior Landscaping: Incorporate PU stone panels into landscaping designs for features such as retaining walls, planter boxes, and decorative garden elements.
Commercial Spaces: PU stone panels can be used in commercial settings such as restaurants, hotels, retail stores, offices, and reception areas to create a welcoming and visually appealing environment for customers and visitors.
Outdoor Living Spaces: Install PU stone panels in outdoor living spaces such as patios, decks, pergolas, and outdoor kitchens to enhance the design and create a cohesive look with the surrounding landscape.
When fixing PU stone panels, ensure that the surface is clean, flat, and properly prepared according to the manufacturer’s instructions. Use suitable adhesives and fasteners designed for outdoor or indoor applications, depending on the installation location. Follow proper installation techniques and safety precautions to ensure a secure and durable installation.
PU faux Stone Panel till now has how many shapes?

PU (polyurethane) stone panels come in a variety of shapes and styles, designed to mimic the appearance of natural stone while offering the advantages of lightweight and easy installation. The exact number of shapes available may vary depending on the manufacturer and specific product lines. However, here are some common shapes and styles of PU stone panels:
- Fieldstone: Fieldstone panels typically feature irregular shapes and sizes, mimicking the appearance of stones found in nature. They often have rough textures and varying colors to create a rustic and organic look.
- Stacked Stone: Stacked stone panels consist of tightly stacked stone pieces, providing a modern and streamlined aesthetic. These panels often feature straight edges and clean lines, resembling stacked stone walls commonly seen in contemporary architecture.
- Ledgestone: Ledgestone panels feature prominent horizontal lines and varying depths, creating a textured and dimensional appearance. They may incorporate irregularly shaped stones arranged in horizontal layers, reminiscent of natural ledges or outcroppings.
- Cobblestone: Cobblestone panels mimic the look of small, rounded stones commonly used in cobblestone streets and pathways. These panels typically feature smooth or lightly textured surfaces with rounded edges, creating a classic and timeless look.
- Brick: Some PU stone panels are designed to resemble traditional brick walls, offering a rustic and charming appearance. These panels may feature rectangular shapes with mortar joints, replicating the look of traditional bricklaying.
- River Rock: River rock panels imitate the smooth, rounded stones found in riverbeds and streambanks. These panels often feature a mix of sizes and colors, creating a natural and tranquil ambiance reminiscent of river landscapes.
- Limestone: Limestone panels emulate the appearance of limestone, a popular natural stone known for its soft, muted colors and subtle textures. These panels may feature smooth or slightly textured surfaces with gentle variations in color and tone.
These are just a few examples of the shapes and styles of PU stone panels available on the market. Manufacturers may offer additional variations and custom options to suit different design preferences and project requirements. we,FOROREE are in the progress designing new items and designs for you!
Which tools are needed during install PU Stone Panel ?

Installing PU (polyurethane) stone panels typically requires a few basic tools to ensure proper placement and secure attachment to the wall surface. Here’s a list of commonly used tools for installing PU stone panels:
- Measuring Tape: Essential for accurately measuring the dimensions of the wall and the panels to ensure proper fit and alignment.
- Level: Used to ensure that the panels are installed straight and level horizontally and vertically.
- Pencil or Marker: For marking reference lines on the wall to guide the installation of the panels.
- Utility Knife or Saw: Needed for cutting the panels to size, especially when fitting them around corners, outlets, or other obstructions.
- Adhesive: PU stone panels are typically installed using construction adhesive designed for bonding materials such as polyurethane foam to various surfaces. Make sure to use adhesive suitable for both the panel material and the wall surface.
- Caulking Gun: Used for applying construction adhesive to the back of the panels before attaching them to the wall.
- Putty Knife or Trowel: For spreading adhesive evenly on the back of the panels and removing excess adhesive that squeezes out during installation.
- Screws or Nails (Optional): Depending on the manufacturer’s recommendations and the condition of the wall surface, screws or nails may be used in conjunction with adhesive to provide additional support and stability for the panels.
- Safety Gear: This includes gloves and safety glasses to protect your hands and eyes during the installation process.
- Sandpaper (Optional): If necessary, sandpaper can be used to smooth any rough edges or uneven surfaces after cutting the panels to size.
- Cleaning Supplies: Rags or sponges and mild detergent may be needed to clean the wall surface before installing the panels, ensuring proper adhesion.
Before beginning the installation process, always carefully read and follow the manufacturer’s instructions provided with the PU stone panels to ensure proper installation and to avoid any potential issues. Additionally, it’s recommended to prepare the wall surface by cleaning it thoroughly and ensuring it’s dry and free of dust or debris before applying adhesive and installing the panels.
Does PU Stone Panel faux rock DIY- Friendly ?
Yes, PU (polyurethane) stone panels are generally considered DIY-friendly for installation. Here’s why:
- Lightweight: PU stone panels are lightweight compared to natural stone or brick, making them easier to handle and install without requiring heavy-duty equipment or assistance.
- Easy to Cut: PU stone panels can be easily cut with a utility knife or saw to fit around corners, outlets, or other obstructions, allowing for precise customization during installation.
- No Specialized Skills Required: Installing PU stone panels typically doesn’t require specialized skills or training. As long as you follow the manufacturer’s instructions and have basic tools, most DIY enthusiasts should be able to complete the installation successfully.
- Adhesive Installation: PU stone panels are usually installed using construction adhesive, eliminating the need for mortar or grout. This simplifies the installation process and reduces mess and cleanup time.
- Pre-Finished: PU stone panels often come pre-finished with realistic textures and colors, reducing the need for additional painting or finishing work after installation.
- Flexible Design Options: PU stone panels come in various styles, textures, and sizes, allowing you to create custom designs and patterns to suit your preferences and space.
- Cost-Effective: DIY installation of PU stone panels can save on labor costs associated with hiring professional installers, making it a cost-effective option for home improvement projects.
Does a girl can fix and install PU stones veneer panel herself ?
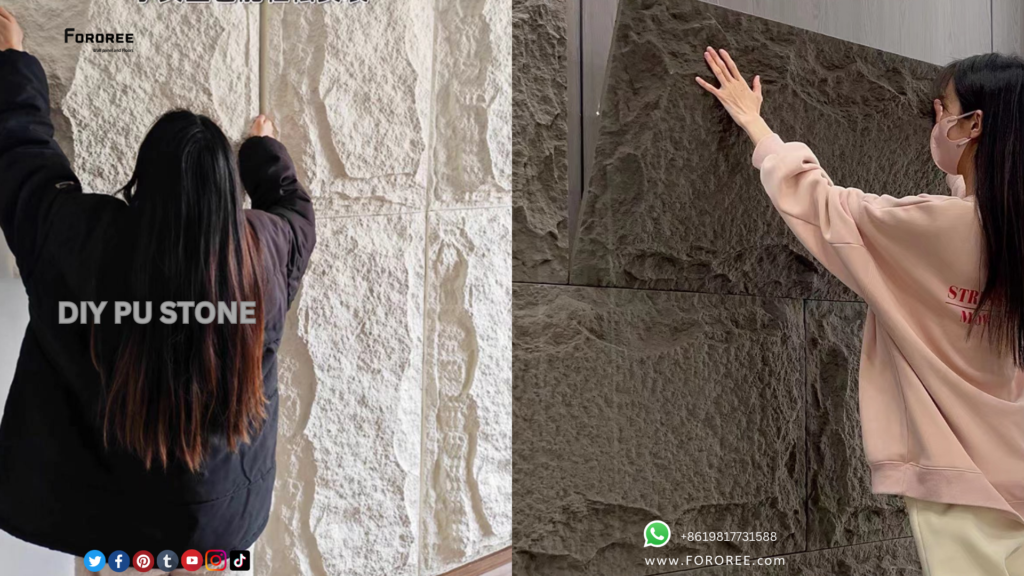
Absolutely! Anyone, regardless of gender, can install PU stone veneer panels themselves with the right tools, materials, and instructions. DIY projects like this are not limited by gender, but rather by skills, knowledge, and determination. Here are a few reasons why a girl or anyone else can successfully install PU stone veneer panels:
- Instructional Resources: There are plenty of tutorials, videos, and step-by-step guides available online that provide detailed instructions for installing PU stone veneer panels. These resources make it accessible for anyone to learn the necessary techniques and procedures.
- Tools and Materials: The tools and materials required for PU stone veneer panel installation are readily available at most home improvement stores. With the right tools and materials in hand, anyone can tackle the installation process.
- Adhesive Installation: PU stone veneer panels are typically installed using construction adhesive, which eliminates the need for specialized skills like masonry or tile setting. Applying adhesive and attaching panels to the wall is a straightforward process that doesn’t require extensive experience.
- Customization Options: PU stone veneer panels are often designed to be lightweight and easy to cut, allowing for customization to fit specific areas or design preferences. With a utility knife or saw, panels can be trimmed to size without much difficulty.
- Support and Assistance: Even if someone doesn’t have prior experience with DIY projects, they can seek guidance from online resources, friends, or family members who have experience with similar projects. Additionally, many home improvement stores offer assistance and advice to customers embarking on DIY projects.
- Empowerment and Confidence: Taking on a DIY project like installing PU stone veneer panels can be empowering and build confidence. Learning new skills and successfully completing a project can instill a sense of accomplishment and encourage further exploration of DIY endeavors.
Ultimately, the ability to install PU stone veneer panels successfully comes down to preparation, willingness to learn, and attention to detail, rather than gender. With patience, practice, and perseverance, anyone can tackle DIY projects and create beautiful, personalized spaces in their home.
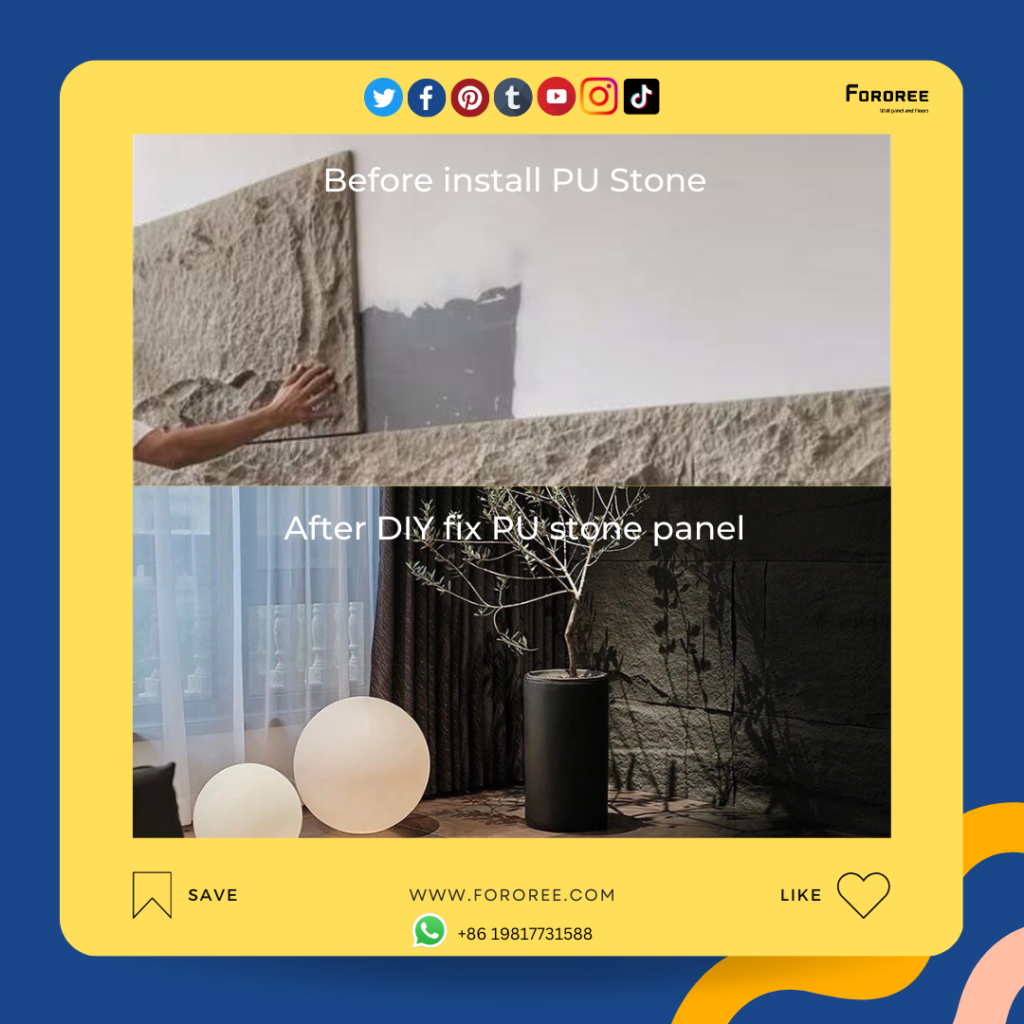
PU Stone Panel after installed will be differently from others since everybody might cut and take the different shape

Yes, you’re correct. PU (polyurethane) stone panels may have slight variations in shape and size after installation, especially if different individuals are cutting and installing them. Here are a few factors to consider regarding these potential differences:
Customization: One of the benefits of PU stone panels is their ability to be customized to fit specific areas or design preferences. However, this customization process may result in variations in the size and shape of individual panels, depending on how they are cut and installed.
Installation Techniques: Different individuals may have varying levels of experience and techniques when it comes to cutting and installing PU stone panels. This can lead to differences in the way panels are trimmed, aligned, and attached to the wall surface.
Pattern and Texture: PU stone panels often come in patterns and textures that mimic natural stone. While manufacturers strive for consistency in their products, variations in pattern and texture may occur due to the manufacturing process or differences between batches of panels.
Overall Aesthetic: Despite potential differences in individual panels, the overall aesthetic of the installed PU stone veneer should still be cohesive and visually appealing. Proper planning, layout, and attention to detail during installation can help minimize any noticeable variations between panels.
Finishing Touches: After installation, any noticeable gaps or inconsistencies between panels can be addressed with caulking or touch-up paint to create a seamless appearance.
It’s essential to approach the installation of PU stone panels with attention to detail and consistency to achieve the desired result. Proper planning, careful measurements, and communication between individuals involved in the installation process can help minimize discrepancies and ensure a professional-looking finish. Additionally, embracing the natural variations inherent in materials like PU stone can add character and charm to the finished project.
PU stone wall panels can be installed outsider ?
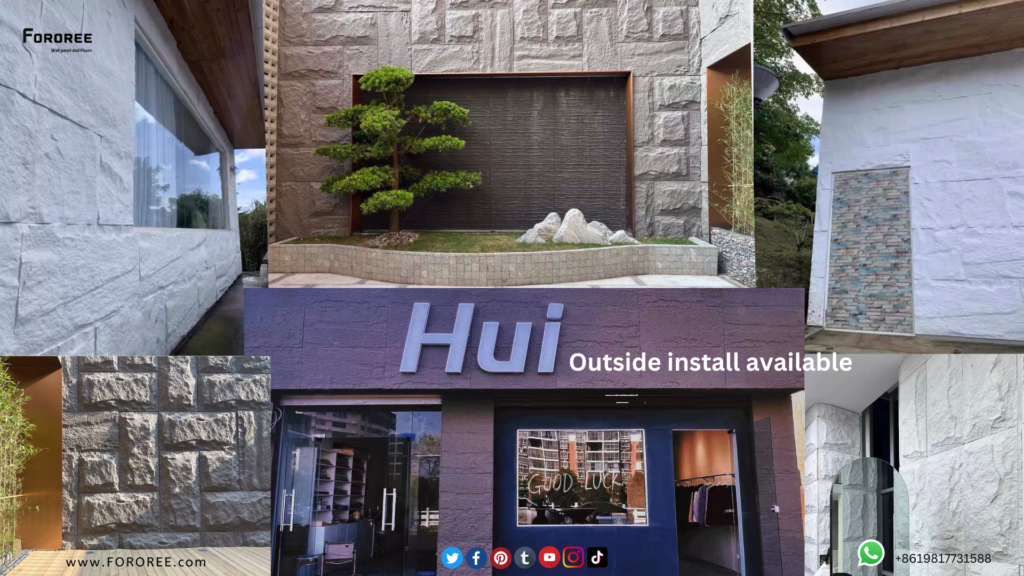
Yes, PU (polyurethane) stone panels can be installed outdoors, but it’s important to use panels specifically designed for exterior applications. These outdoor-rated PU stone panels are formulated to withstand exposure to various weather conditions such as sunlight, rain, wind, and temperature fluctuations.
When installing PU stone panels outdoors, ensure that you follow the manufacturer’s guidelines and recommendations for outdoor installation. Here are some key considerations:
Weather Resistance: Outdoor PU stone panels should have UV protection to prevent fading and deterioration from prolonged exposure to sunlight. They should also be designed to resist moisture, mold, and mildew, ensuring long-term durability in outdoor environments.
Substrate Preparation: Prepare the substrate properly by ensuring it is clean, flat, and structurally sound. Use an appropriate waterproofing membrane or barrier to protect the underlying structure from water infiltration and damage.
Proper Installation: Follow the manufacturer’s instructions for proper installation techniques, including the use of suitable adhesives and fasteners designed for outdoor use. Ensure that the panels are securely attached to the substrate to withstand wind and weather.
Expansion and Contraction: Allow for expansion and contraction of the panels due to temperature changes by leaving adequate expansion gaps at joints and edges. This helps prevent warping, buckling, or cracking of the panels over time.
Maintenance: Regular maintenance is essential to keep outdoor PU stone panels looking their best and maintaining their performance. Clean the panels periodically to remove dirt, debris, and mold, and inspect for any signs of damage or deterioration.
By selecting outdoor-rated PU stone panels and following proper installation practices, you can create a beautiful and durable exterior wall cladding that enhances the aesthetics and value of your outdoor space.
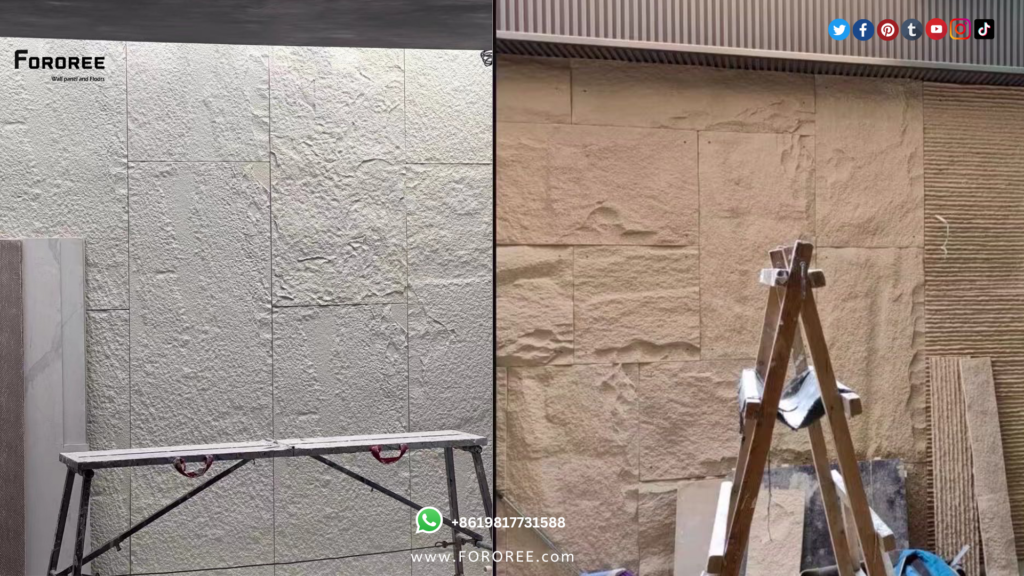
PU Faux stone veneer install video
If installed outside, what should be pay attention to?
When installing PU (polyurethane) stone panels outside, several important considerations should be taken into account to ensure a successful and durable installation. Here are some key points to pay attention to:
Weather Resistance: Choose PU stone panels specifically designed for outdoor use, as they are formulated to withstand exposure to harsh weather conditions such as sunlight, rain, wind, and temperature fluctuations. Ensure that the panels have UV protection to prevent fading and deterioration over time.
Proper Substrate: The substrate or surface onto which the panels will be installed must be structurally sound, flat, clean, and dry. Ensure that the substrate is appropriate for exterior applications and can support the weight of the panels.
Waterproofing: Install a waterproof membrane or barrier behind the panels to prevent water infiltration and moisture damage to the underlying structure. Proper waterproofing is crucial for maintaining the integrity of the installation and preventing issues such as mold, rot, and deterioration.
Adequate Drainage: Ensure that the installation allows for adequate drainage of water away from the wall surface. Proper drainage helps prevent water accumulation behind the panels, which can lead to moisture-related problems over time.
Expansion and Contraction: Allow for expansion and contraction of the panels due to temperature fluctuations by leaving appropriate expansion gaps at joints and edges. This helps prevent buckling, warping, or cracking of the panels as they expand and contract with changes in temperature.
Fastening Method: Use appropriate fasteners and adhesives recommended by the manufacturer for outdoor installations. Securely attach the panels to the substrate according to the manufacturer’s instructions to ensure proper adhesion and stability, especially in windy or high-impact areas.
Sealing and Maintenance: Apply a protective sealant to the surface of the panels after installation to enhance weather resistance and prolong the lifespan of the panels. Regular maintenance, such as cleaning and inspection, is essential to keep the panels looking their best and to address any issues promptly.
Code Compliance: Ensure that the installation complies with local building codes, regulations, and permit requirements for exterior wall cladding to ensure safety and legal compliance.
By paying attention to these considerations and following the manufacturer’s guidelines and best practices, you can achieve a successful and long-lasting installation of PU stone panels outside, enhancing the aesthetics and durability of your outdoor space.
How to select the right shape for the wall cladding?
Selecting the right shape for PU (polyurethane) stone wall cladding depends on various factors including the desired aesthetic, the style of the space, and personal preferences. Here are some considerations to help you choose the right shape for your wall cladding:
- Overall Design Style: Consider the design style of the space where the PU stone panels will be installed. Different shapes evoke different aesthetics. For example, fieldstone panels may be suitable for a rustic or traditional look, while stacked stone panels might complement a modern or contemporary design.
- Architectural Features: Take into account any existing architectural features or elements in the space. Choose a shape that complements these features and enhances the overall design coherence. For instance, if the space has angular architectural elements, ledgestone panels with horizontal lines may complement them well.
- Scale and Proportion: Consider the scale and proportion of the wall surface where the panels will be installed. Larger panels with bold shapes may be suitable for expansive walls, while smaller panels with intricate details may be better suited for smaller accent areas.
- Color and Texture: Evaluate the color scheme and texture of the space. Choose a shape and style of PU stone panels that harmonize with the existing colors and textures or add visual interest through contrast. For example, cobblestone panels with rounded shapes and earthy tones can add warmth and texture to a neutral space.
- Functionality: Consider the practical aspects of the space, such as maintenance requirements and durability. Some shapes and styles may be more suitable for high-traffic areas or areas prone to moisture, while others may require less maintenance and upkeep.
- Personal Preference: Ultimately, your personal preference and taste should guide your choice of PU stone panel shape. Select a shape that resonates with you and reflects your individual style and personality.
- Samples and Mock-ups: If possible, obtain samples or create mock-ups of different shapes and styles of PU stone panels to visualize how they will look in the space. This can help you make an informed decision and ensure that the chosen shape complements the overall design vision.
By considering these factors and taking the time to explore different options, you can select the right shape for PU stone wall cladding that enhances the beauty and functionality of your space.
Want to know more, contact us hello@FOROREE.com